
LINEAR BLOG
How to Import a Card Holder Database on a Linear® e3 Access Control System
Editorial Staff | October 6, 2021
noreply@linear-solutions.com
Today, we’re sharing one of our most requested tech tips from dealers: how to import a card holder database on a Linear® e3 access control system. User Data Import provides the ability to import cardholder data from a CSV file. This is especially useful when the e3 system is replacing another vendor’s system. The previous system cardholder database can be imported into the e3 system, eliminating the need to manually re-enter all of the cardholder data.
This procedure will walk you through the steps of performing a User Data Import. Before using this feature, it is important to note that:
- The imported file must be a CSV file.
- Column headers on the imported file must match those present in the User Data Export file. It is suggested to perform a data export and use it as a template for the import file.
- You must have the related card formats and access levels configured before importing the file.
- You cannot use the following special characters in any of the fields: ?{})(*&%#@
- Data will not be imported unless the information is entered in the same manner that it appears in the eMerge software database (e.g. case and syntax sensitive).
Here is the process, presented step-by-step:
- Go to Site Map > Data Transfer > User Data Import
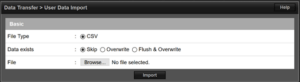
- File Type is CSV and cannot be deselected
- Select the desired Data Exist selection
- Skip: If there is a difference between cardholder data in the panel and cardholder data in the CSV file, the data in the panel remains intact when the file imports.
- Skip examples:
- In the panel, a cardholder has Exempt selected. You export that database. In the CSV file, you de-select Exempt, then you import the database. After importing, the cardholder will still have Exempt selected.
- In the exported CSV file, you changed a cardholder’s card number. If you import that database, the cardholder will now be shown with two cards: the original card number and the one you changed to in the CSV file.
- Overwrite: If there is a difference between data in the panel and data in the CSV file, the imported data overwrites the panel data.
- Overwrite examples:
- In the panel, a cardholder has Exempt selected. You export that database. In the CSV file, you de-select Exempt, then you import the database. After importing, the cardholder will not have Exempt selected.
- In the exported CSV file, you change a cardholder’s card number. If you import that database, the cardholder will be displayed with the new number.
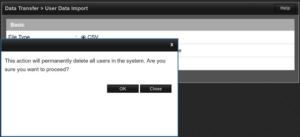
- Flush and Overwrite: You will receive a message indicating that this selection will permanently delete all users in the system. When the CSV file is imported, all cardholders in the panel are deleted, and only those in the CSV file will be available.
Stay tuned to our blog for more commercial access system tech tips like these. In the meantime, feel free to browse some of our recent posts.