
LINEAR BLOG
How to Create and Use Groups on a Telephone Entry System
Editorial Staff | June 27, 2021
noreply@linear-solutions.com
Overview: Groups allow grouping “like” objects (exterior doors or personnel with the same attributes) into a single group. Once a Group is created, it can be used to simplify the process of creating Access Levels, door rules, etc.
This how-to blog will describe how to create and use two different types of groups: Door Groups and Cardholder Groups.
In this example, assume there is a building with several exterior doors which all tenants have access to. Instead of having to add each door individually to an Access Level, put all of the exterior doors into a Group, then add the door group to the cardholder’s access level.
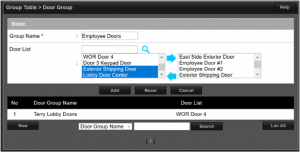
- Create a Door Group
- Go to Site Map > Groups > Door Group
- Select Door Group, select New, and name the group
- In the Door List, select the doors to be applied to the group. You can use the Ctrl key to select more than 1 door at a time
- Once the desired doors have been selected, press the right-facing blue arrow to move them to the box on the right
- Select Add
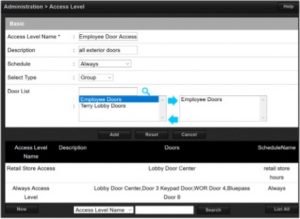
- Using a Door Group in an Access Level
- When adding doors to an Access Level, you can select doors individually or you can select a pre-defined Door Group to simplify the process. In this example, we will select the Door Group created in Step 1
- Access the desired Access Level by using the Wizard or by going to Site Map > Administration > Access Level
- Click on and open the Access Level, then select Edit
- Ensure the correct schedule is selected
- For Select Type, choose Group
- Select the desired Door Group, then click on the right-facing arrow to move the group into the box on the right
- Select Save
- When this Access Level is attached to a Card, that card will have access to all the doors in that group if the Schedule is active
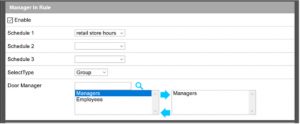
In this 2nd example, a Cardholder Group will be created and used in a Door’s Manager In Rule
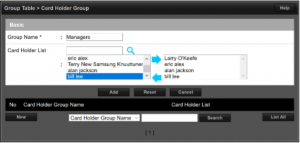
- Create a Cardholder Group
- Go to Site Map > Groups > Cardholder Group
- Select Cardholder Group, click on New, and name the group
- In the Cardholder List, select the personnel to be added to the group. You can use the Ctrl key to select more than 1 cardholder at a time
- Once the desired Cardholders have been selected, press the right-facing blue arrow to move them to the box on the right
- Select Add
- Using a Cardholder Group in a Door’s Manager In Rule
- When adding Cardholders to a door rule, you can select Cardholders individually or you can select a pre-defined Cardholder Group
- In this example, we will select the Cardholder Group created in Step 1 and add it to a Door’s Manager In Rule
- Access the desired Door by using the Wizard or by going to Site Map > Device Setting > Door
- Click on and open the Door, then select Edit
- Scroll down to Manager In Rule, then select Enable
- Select the desired Schedule. Then for Select Type, choose Group
- Click on the desired Cardholder Group, then click on the right-facing arrow to move the group into the box on the right
- Select Save
- AFTER the schedule becomes active, cardholders swiping valid cards can access the door
Check out our blog for more how-to’s, installation tips and more!